Monday, January 28, 2013

Ecorche Drawings


   A good way to start seeing what it is making the form or morphology of the figure is to do ecorche drawings. Find good images from old masters or take your own photos and draw over them the skeleton or muscles. Its a great exercise and difficult to do.....don't forget to study what the names are of each bone and muscle you draw.


Mid Term

5 views of the skeleton 

Pick one of two areas (the ribcage or the pelvis) to focus on then draw five different angles of that region. Make sure to include some information of the surrounding bones.


Some things to include and consider
  • 18x 24 or bigger drawing paper. Can be on white or toned (try and keep it a middle value) paper. 
  • Medium of your choice but I recommend that you choose something that will give you the most contrast. (prisma colors work really well for this). If you want to add some color you have a max of three colors. Two of the three must be Black and White.
  • Must have a one inch boarder all the way around the drawing.
  • Keep it Clean. 

Thursday, January 24, 2013

Skeleton


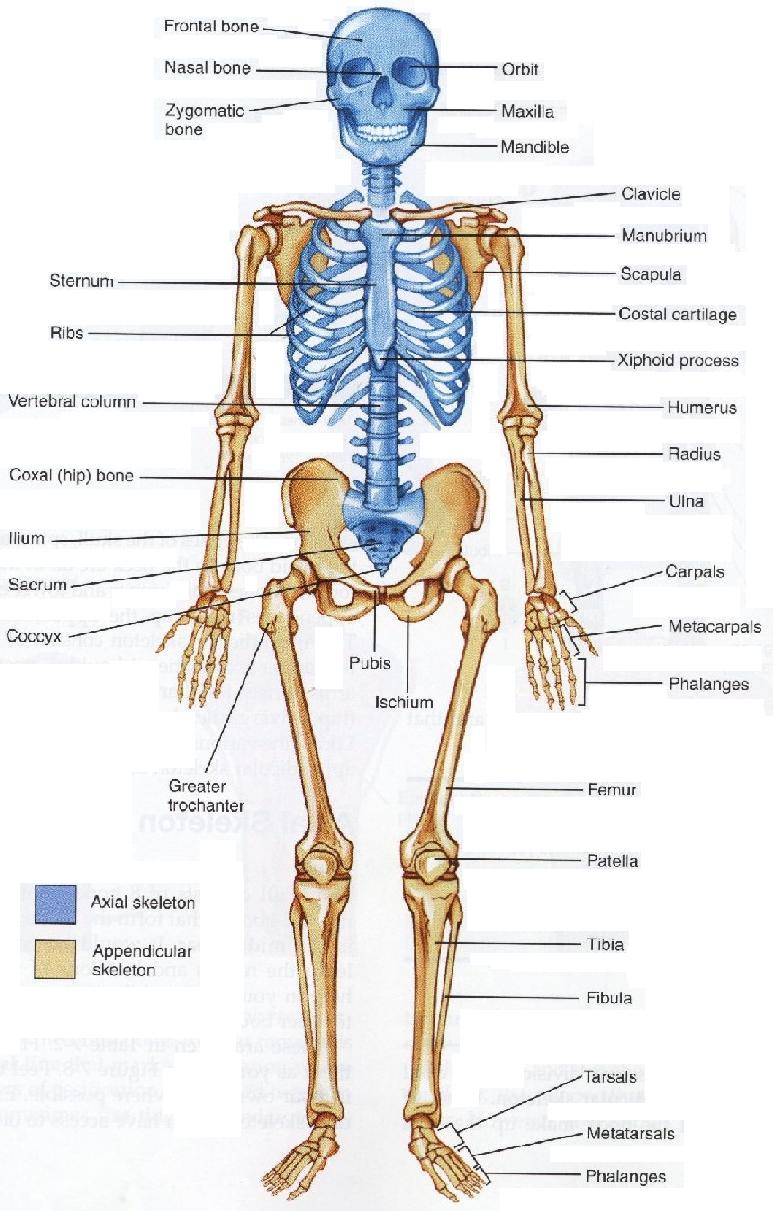
Human newborns have over 270 bones some of which fuse together into a longitudinal axis, the axial skeleton, to which the appendicular skeleton is attached. The human skeleton is a collection of bones held together by ligaments, tendons, muscles and cartilage. The skeleton provides a framework for the body. It holds and protects the organs. It also provides a structure for the interconnecting muscles.
Many of the bones, such as the skull, vertebral column or spine, and thoracic cage or ribs are designed to transfer the weight of the head, the trunk, and the upper limbs down to the hip joint and lower limbs. this transfers the weight to the ground, and is responsible for maintaining the upright position of the body.
Many bones are connected at joints, where the bones are interconnected by muscles. These muscles allow the bones to move relative to each other, allowing us to walk, run and any other activity that involves movement of the body.


Axial skeleton
The axial skeleton (80 bones) is formed by the vertebral column (26), the rib cage (12 pairs of ribs and the sternum), and the skull (22 bones and 7 associated bones). The upright posture of humans is maintained by the axial skeleton, which transmits the weight from the head, the trunk, and the upper extremities down to the lower extremities at the hip joints. The bones of the spine are supported by many ligaments. The erectors spinae muscles are also supporting and are useful for balance.
Appendicular skeleton
The appendicular skeleton (126 bones) is formed by the pectoral girdles (4), the upper limbs (60), the pelvic girdle (2), and the lower limbs (60). Their functions are to make locomotion possible and to protect the major organs of locomotion, digestion, excretion, and reproduction.
Function
Support
The skeleton provides the framework which supports the body and maintains its shape. The pelvis, associated ligaments and muscles provide a floor for the pelvic structures. Without the rib cages, costal cartilages, and intercostal muscles, the heart would collapse.
Movement
The joints between bones permit movement, some allowing a wider range of movement than others, e.g. the ball and socket joint allows a greater range of movement than the pivot joint at the neck. Movement is powered by skeletal muscles, which are attached to the skeleton at various sites on bones. Muscles, bones, and joints provide the principal mechanics for movement, all coordinated by the nervous system.

Protection
The skeleton protects many vital organs.
  • The skull protects the brain, the eyes, and the middle and inner ears.
  • The rib cage, spine and sternum protect the lungs, heart and major blood vessels. 
  • The clavicle and scapula protect the shoulder. 
  • The ilium and spine protect the digestive and urogenital systems and the hip.
  • The patella and the ulna protect the knee and the elbow respectively.
  • The carpals and tarsals protect the wrist and ankle respectively. 


Features of the Bones
The bones have a variety of knobs and hollows that provide for many different kinds of attachment.
Convex Forms
An eminence is the lowest kind of convexity - a flat bump.
A protuberance is a larger, roundish bump. A tubercle (TOO-ber-cul) is the same shape.
A tuberosity (too-ber-OSS-i-tee) is a high, elongated bump.
A process is a form large enough to jut out, often forming a finger-like shape.
A ramus (RAY-mus) is a flat branch of bone.
A spine is a long, sharp ridge.
A crest is a cliff-like edge.
A condyle (CON-dial) is a knob shape that faces the joints.
An epicondyle (ep-ih-CON-dial) is a bump near a condyle.
Concave Forms
A trochlea (TROK-lee-uh) is a spool-shaped form. A trochlea is shaped to receive a convexity at a joint and allow movement only through one plane.
A facet (fa-SET) is a shallow depression that recieves the convexity of another bone at a joint.
A fossa (FOSS-uh) is a hollow that is deeper than a facet.
A foramen (fuh-RAY-men) is a hole.
A groove is exactly that, a thin, linear depression.
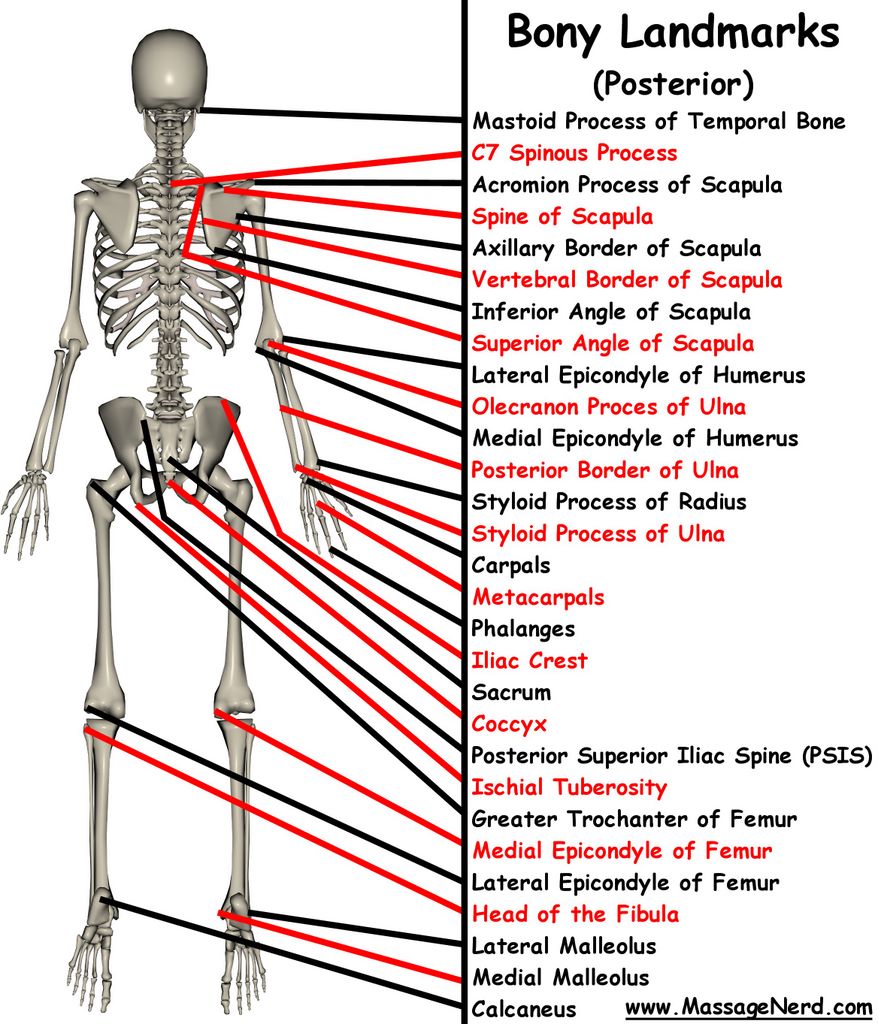
Bony Landmarks


Bony Landmarks
From person to person flesh varies more than bone. The skeleton, by comparison, offers a more stable set of reference points. Therefore artists are well served by becoming familiar with bony landmarks - points on the skeleton close to the skin that can be located by sight. By finding these landmarks, the positions of the bones can be determined, and the fleshy forms can be hung from them, as it were.
The spine has three bony landmarks: cervical vertebra #7, or C7 for short, and thoracic vertebra #12, or T12. Because of the way the cervical vertebrae sit on the ribcage, the neck pitches forward from C7; the whole head can be seen sitting forward from C7. Because of the mass of the ribcage, usually there's a shadow hanging around T12, where the two twelfth ribs connect. At the bottom of the spine is the sacrum, a wide bone that connects the spine to the pelvis.
The pelvis has three important landmarks. One is anterior superior iliac spine. ASIS looks like a complex term, but not upon examination: anterior means in front, and superior means higher (it sits directly above a smaller spine on the pelvis). The bone on this portion of the pelvis is the ilium (ILL-ee-um), hence iliac (ILL-ee-ack). A spine in this context is a little projection of bone.
The second is posterior superior iliac spine. The term has the same derivation, but since it lies on the back, it is posterior. PSIS sits under each dimple on the lower back, right above the buttocks.
The third is the pubic symphysis, where the bones of the pubic arch meet in the middle.
The ribcage has three landmarks. The supersternal (soo-per-STIR-nal) notch likes above the sternum, between the clavicles. There's a little hollow here at the base of the neck. At the other end lies the infrasternal notch, where the ribs meet the sternum. There's a hollow here as well. The third landmark is the low point of rib #10. This is the bottom of the ribcage when viewed from the front, because ribs #11 and #12 don't attach to the sternum. Rib #10 seems to rise up from this point towards the sternum and towards the back.
The scapula (SKAP-you-luh) has three landmarks. One is the acromion (uh-CROW-mee-on) process, the bony point of the shoulder. One is the spine of the scapula, which extends from the acromion to the medial side of the scapula. The third is the inferior angle of the scapula.
The leg has three. One the femur, the large bone of the thigh, is the great trochanter (TROW-kan-ter). This lies under the dimple on the hip when viewed from the side. Visible and palpable on either side of the knee are the condyles of the femur.
The lower leg has two bones. The tibia is larger and has two landmarks - the medial condyle, and the medial malleolus (mal-ee-OLE-lus), which is the medial bone of the ankle. The fibula is smaller, and has two landmark - the head, at the superior end, and the lateral malleolus, which is the bone of the ankle on the lateral side.
Between the femur and the tibia lies the patella (puh-TELL-uh), the kneecap, which is a landmark in its own right.
The humerus (rhymes with humorous), the bone of the upper arm, has two: the medial and lateral epicondyles, which can be seen and felt on either side of the elbow.
The ulna extends from the elbow to the pinky side of the hand. The point of the elbow is on the ulna, and is called the olecranon (oh-LECK-ruh-non). The head of the ulna is visible as a bump on the pinky side of the wrist.
The radius extends from the lateral condyle of the humerous (which is not a landmark, as it lies deep under the muscles of the arm) to the thumb side of the hand, where its styloid process is visible on that side of the wrist. It is worth noting that the ulna forms the axis of the lower arm; the radius is flipping around it as the forearm pronates and supinates. (Don't be fooled by the fact that the head of the ulna and the head of the radius are at opposite ends of the forearm. The heads of bones have a distinguishable common shape.)
The hyoid bone forms the corner of the neck. It's sitting at the top of the windpipe.
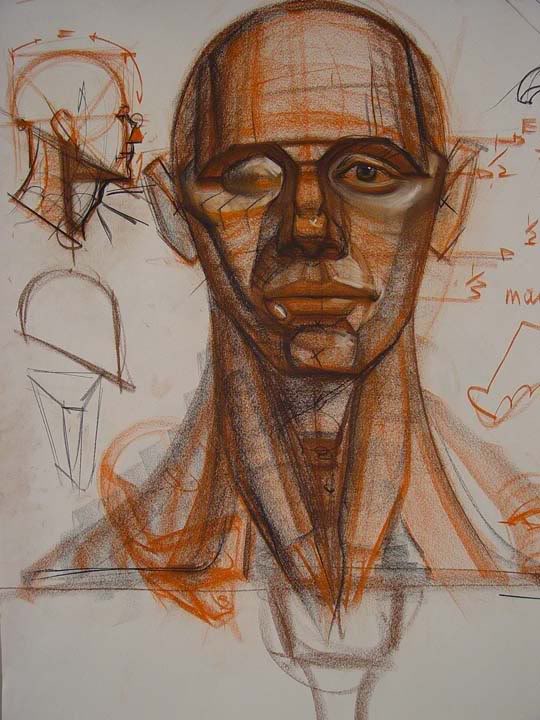
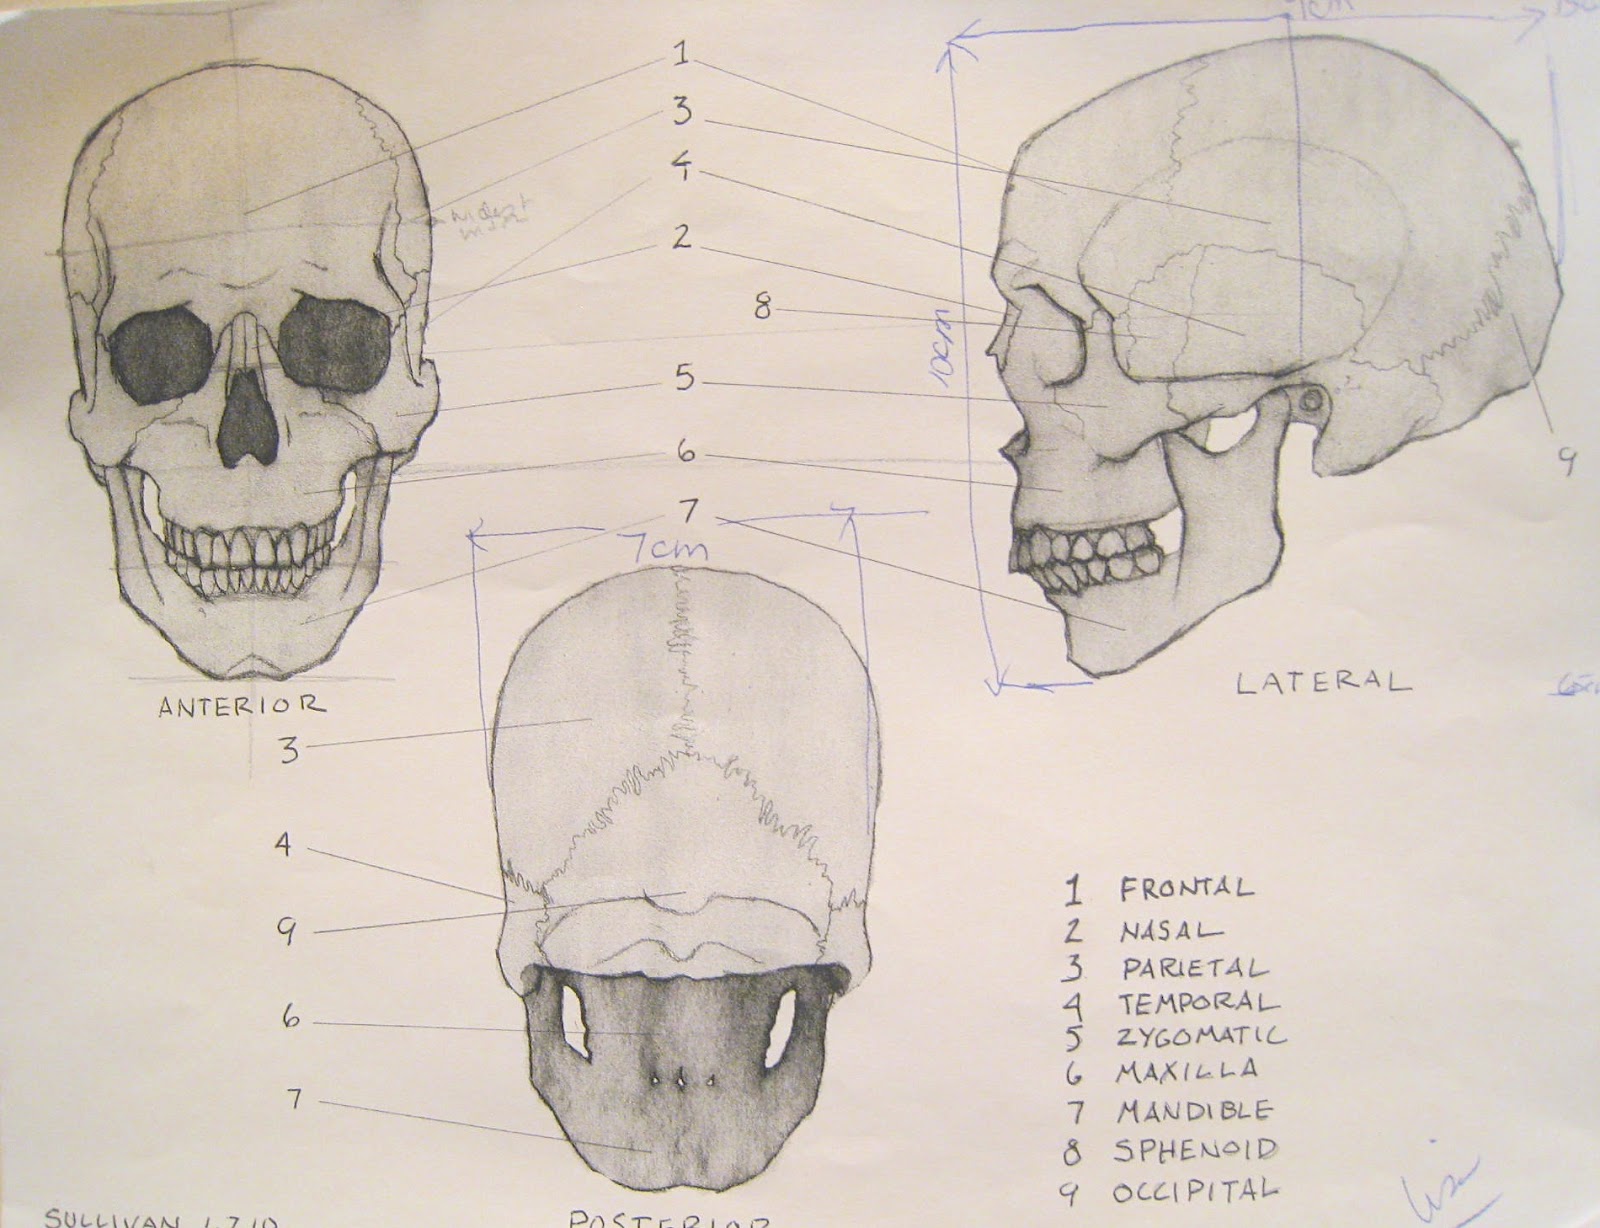
The skull has two landmarks useful for drawing the whole figure: the chin, and the occipital (ox-SIP-it-al) protuberance, a little projection of bone at the base of the skull.


Check out this link for a good video of the bony landmarks.
http://www.sophia.org/bony-landmarks-tutorial


Control Lines
These lines connect key points of the body in ways that don't usually occur to the beginner, but set up a framework to create form expediently. The control lines include some fleshy landmarks as well.
Spine Line
  1. occipital protuberance
  2. C7
  3. T12
  4. sacrum
  5. top of gluteal cleft (the split of the buttocks)
  6. bottom of gluteal cleft

Center Line
  1. chin
  2. hyoid bone
  3. supersternal notch
  4. infrasternal notch
  5. navel
  6. pubic symphysis

Front Line
  1. acromion process
  2. nipple
  3. low point of rib #10
  4. anterior superior iliac spine (ASIS)
  5. pubic symphysis

Back Line
  1. acromion process
  2. spine of scapula
  3. inferior angle of scapula
  4. posterior superior iliac spine (PSIS)
  5. top of gluteal cleft

Medial Leg Line
  1. pubic symphysis
  2. ASIS
  3. medial condyle of femur
  4. patella
  5. medial malleolus
  6. head of metatarsal #1
  7. calcaneus

Lateral Leg Line
  1. ASIS
  2. great trochanter
  3. lateral condyle of femur
  4. head of fibula
  5. lateral malleolus
  6. head of metatarsal #5
  7. calcaneus

Medial Arm Line
  1. acromion process
  2. medial epicondyle of humerus
  3. olecranon
  4. head of ulna
  5. head of metacarpal #5

Lateral Arm Lineacromion process
  1. lateral epicondyle of humerus
  2. styloid process of radius
  3. head of metacarpal #2


Negative Space


When most people draw the figure, they approach it as an “object-oriented” exercise. The figure is an object, which occupies a certain space within a room. There she sits - boom - simple. Well, it’s not really that simple. There are other forces at work here. The space surrounding the figure can be seen as much as an object (or force) as that mass of humanity sitting in it. The space beyond the figure and around the figure creates interesting negative shapes, planes, and edges when the lines of the space intersect the figure.

Looking Beyond the Figure
Beyond the figure, walls create shapes, table legs create shapes, lamps create shapes, easels create shapes and shadows from these items create shapes. They also create holes in space (think of it as the air between the objects or through the objects).
These have a definitive form, and when they intersect the figure, they give us landmarks for our overall picture plane, which helps to unite it and make for a more cohesive drawing (one that doesn’t happen by chance - one that you control).


Straight line Block-In

Because the figure is exceptionally complex in its form and relationships, the wise artist always begins each drawing by simplifying it to its basic elements and shapes in order to establish it initially on the paper. The first stage of the this is the Gesture Sketch. The next stage is to establish a rough and simplified (but more accurate) version of the figure over the lightly-drawn gestural foundation.

In drawing, straight lines are easier to draw, revise, and estimate than curved lines. Therefore, it only makes sense to begin refining your drawing by constructing it from a series of quickly-drawn, "straight-ish" lines. These should be done using motor-stroke, employing long, rhythmical, sweeping lines that describe the rough proportions, angles, and positions of body parts. Do not --at this stage--try to be precise, detailed, or to draw overly-contolled contours. The idea is to capture the basic form quickly, keeping it simple so that it can be subsequently revised until all the parts are properly aligned, proportioned, and angled.

When you've completed the basic simple shapes you can start to use vertical and horizontal plumb lines.  
Plumb lines are vertical or horizontal lines that remain constant and are another objective device that will help you determine if you proportions and relationships are correct.

Don't hesitate to locate the same point by using more than one angle or measurement to assess its placement; the old adage, "measure twice, cut once" holds true here. Sometimes the technique of locating the same point with more than one angle is known as triangulation where three lines intersect at a common location. This might be the point where a vertical, a horizontal and a diagonal line intersect, or it may be where three separate diagonals intersect. This principle could be utilized in determining landmarks where as few at two lines intersect or where many intersect, as with the center of a wagon wheel.


Basically you are making comparisons and training your eye to see those naturally. Making construction lines through the figure to see what else lines up on that same line. Also its a good idea to look at the negative shapes that are created with the plumb lines to compare distances.

Proportions


Learning how to draw the Human Form efficiently and effectively takes a lot of time, practice and patience. I don’t pretend to be a master of anatomically correct drawing, but I do attempt to consult my charts and references often when I am trying to establish a believable looking figure. Understanding the structure of the human body and its extents and limits is the key in creating forms that are lifelike and realistic in a relative sense – you could be doing life drawings and attempt to be infinitely realistic, or you may be making simplistic cartoons or caricatures which should have some semblance of being anatomically correct. 
Though there are subtle differences between individuals, human proportions fit within a fairly standard range, though artists have historically tried to create idealized standards, which have varied considerably over different periods and regions. In modern figure drawing, the basic unit of measurement is the 'head', which is the distance from the top of the head to the chin. This unit of measurement is reasonably standard, and has long been used by artists to establish the proportions of the human figure. 

The proportions used in figure drawing are:


An average person, is generally 7-and-a-half heads tall (including the head).An ideal figure, used when aiming for an impression of nobility or grace, is drawn at 8 heads tall.A heroic figure, used in the heroic for the depiction of gods and superheroes, is eight-and-a-half heads tall. Most of the additional length comes from a bigger chest and longer legs.To memorize the ideal measurements and proportions of the male and female human figure should be the student's earnest endeavor, and, with this end in view, the essentials of the various tables that have been constructed for this purpose are presented here. 


There are many current and aspiring artists who neglect to refer to the basic fundamentals of anatomy and proportion and dismiss blatant errors as drawing in their own particular style. I’m not going to argue about being right and being wrong in this aspect, but if a body appears jarring and awkward to most people, chances are you’ve done something wrong when you were putting the pieces together. If something isn’t right about a figure that is meant to resemble the human form, (something that you are completely connected to and know and understand) you’ll notice right away. At times – when you draw it yourself, you become so engrossed in your work that you overlook the obvious. To avoid these embarrassing mistakes, make sure you take some time to review the basics of the human form and study the details before leaping into drawing subjects you don’t have a lot of practice with.


Proportions - Male
Note that you’ll want to determine the height of your male on page, divide the height by 8, and work from there – you’ll see there are specific ratios for certain areas of the body. The measurements are determined by head units – one of the 8 divisions you set up is the size of the human head – everything is in relation to that one size.
  • The body width = 2 1/3 heads
  • The body height = 8 heads
  • Distance between nipples on chest = 1 head
  • Width of calf muscles together at lower arc = 1 head
  • Bottom of the knees = 2 heads from ground level
For further reference, the diagram has a scale in feet to give you an idea of where certain body parts would be in relation to the heights/widths of other objects (vehicles, furniture, etc)
Proportions - Female
For women, the ratios differ slightly as the average form is smaller then the form of an average man. The overall height is measured in 8 Head Units, but because the female head is proportionately smaller, the figure will be smaller.
  • The body width = 2 heads wide
  • Waist = 1 head wide
  • Buttocks = 1 1/2 heads wide
  • Width of calf muscles together at mid-point = 1 head wide
  • Bottom of the knees = 2 heads from ground level
Now you can alter the proportions slightly to exaggerate features, but you shouldn’t stray too far from the aforementioned guidelines, otherwise your figures will appear alien and awkward. Here’s a diagram with somevariations in human proportion.


Assignment #1


Think of this assignment as if you where developing a medical journal. 

Three views 

1 Anterior 
2 Posterior
3 Lateral


Mark and label 

1 Frontal
2 Nasal 
3 Parental
4 Temporal
5 Zygomatic/and arch
6 Maxilla
7 Mandible
8 Sphenoid
9 Occipital
10 Orbital 
11 Nasal Cavity
12 Superciliary Ridge

Size 18x24 on drawing paper (not newsprint)

Graphite-with max of two values in the darks

Want to see the separation or the fusion lines in the bones.


Gesture


The gesture sketch is an essential part of the preliminary stages of any drawing. It is created with a motor stroke employing a rapid, expressive, and loose line. Its purpose is fourfold; one, to quickly establish the major relationships of the body parts to each other; two, to capture the sense of movement and the weight and mass of the subject; three, to establish the relationship of the figure to the page and to other objects; and four, to establish the scale of the figure.

The gesture should be the very first thing that the artist draws, and should be finished within the first few minutes. It should also be drawn lightly, since the subsequent stages of the drawing will be superimposed over the top of it.

Don't be concerned with details or accuracy. Be careful not to draw "stick" figures, concentrate on edges, or to outline. Use rhythmic, expressive marks to draw through the subject. Your purpose is to establish general and broad relationships that will be subsequently refined and adjusted in the later stages of the drawing.